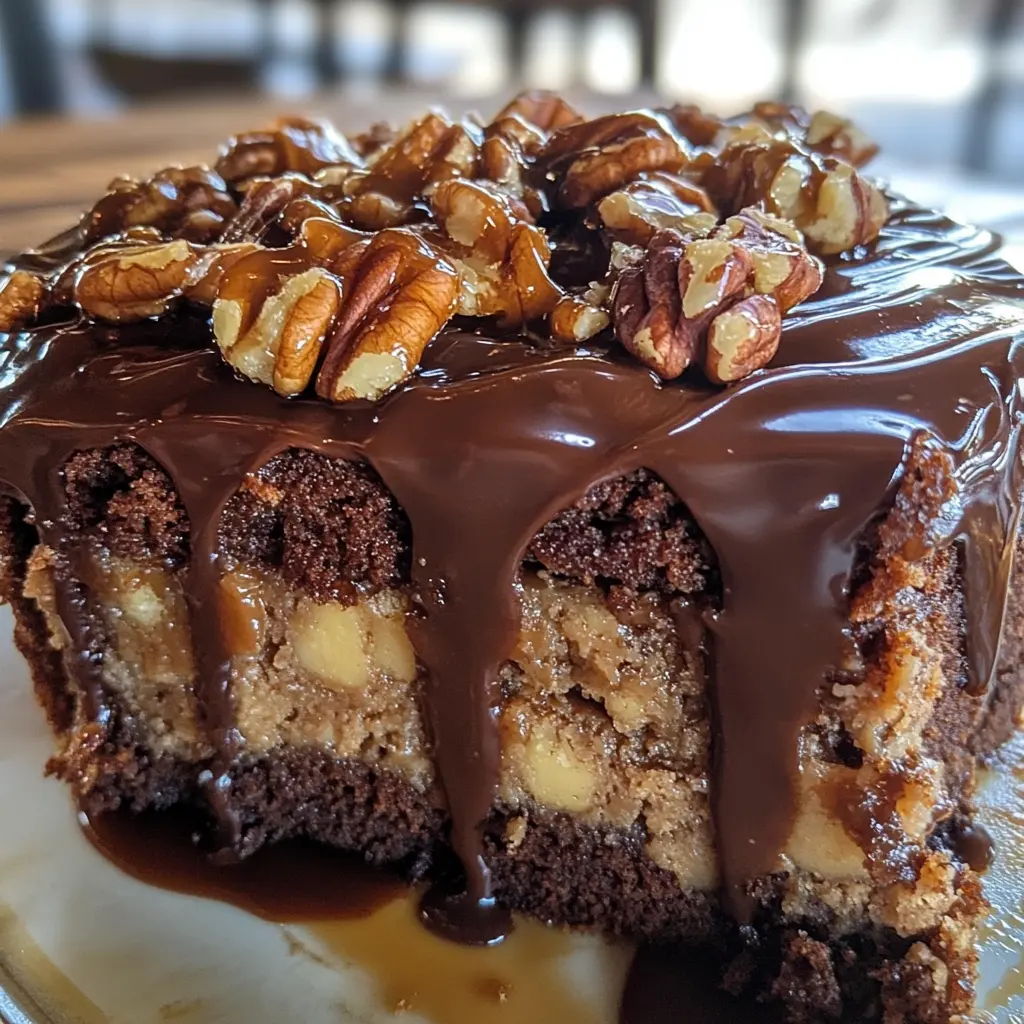
There’s something magical about peanut butter and chocolate together. It’s like they were meant to be best friends—one rich and nutty, the other deep and chocolaty. The way the creamy peanut butter complements the slightly bitter notes of chocolate creates an irresistible combination that has stood the test of time.
Now, imagine them baked into a fudgy brownie, creating a dessert that not only melts in your mouth but also satisfies every sweet and salty craving in one bite. That’s what we’re making today: peanut butter brownies so good, they might just become your new favorite dessert. These brownies offer the best of both worlds—decadent chocolate flavor paired with the unmistakable nutty richness of peanut butter.
The combination of peanut butter and chocolate is legendary, and when they come together in brownie form, it’s pure dessert bliss. The contrast between the gooey chocolate and the slightly grainy peanut butter texture makes for an indulgent experience that feels homemade yet bakery-worthy. Whether you’re a fan of peanut butter cups or just love a good homemade treat, this recipe will win you over with its balance of flavors, texture, and sheer deliciousness.
Table of Contents
Why You’ll Love These Peanut Butter Brownies
If you love classic brownies but wish they had a little more pizzazz, this recipe is for you. These brownies are:
- Super fudgy—no cakey brownies here! The texture is rich, chewy, and packed with indulgent chocolate flavor. Each bite is pure decadence, with a gooey center that melts in your mouth.
- Packed with peanut butter flavor—in both the batter and swirled on top, ensuring every bite is a peanut butter lover’s dream. The peanut butter creates a smooth, creamy contrast to the rich chocolate, making for a perfectly balanced dessert.
- Easy to make—just one bowl for the batter and a few simple ingredients, so you don’t have to worry about a sink full of dishes. You won’t need any fancy equipment, and the whole process is straightforward, even for beginner bakers.
- Perfectly sweet and salty—because peanut butter adds that little savory touch that keeps you coming back for more. The balance of flavors makes these brownies completely addictive, creating an irresistible mix of salty and sweet that keeps you reaching for another square.
Now, let’s get baking! You’re about to whip up the most irresistible batch of brownies you’ve ever had. The smell alone will have everyone running to the kitchen, and once you take that first bite, you’ll understand why these brownies are such a hit.
Ingredients You’ll Need
The best part about this recipe? You probably already have most of these ingredients in your pantry. Here’s what you’ll need to create these decadent peanut butter brownies.
For the Brownies:
- 1 cup (2 sticks) unsalted butter, melted
- 1 cup granulated sugar
- 1 cup brown sugar, packed
- 1 teaspoon vanilla extract
- 4 large eggs
- 1 cup all-purpose flour
- 3/4 cup unsweetened cocoa powder
- 1/2 teaspoon salt
- 1/2 teaspoon baking powder
For the Peanut Butter Swirl:
- 3/4 cup creamy peanut butter (melted slightly)
- 1/4 cup powdered sugar
- 1 teaspoon vanilla extract
- 2 tablespoons milk (if needed for consistency)

Step-by-Step Instructions
Making these brownies is easier than you think. Just follow these simple steps, and you’ll have a pan of fudgy, peanut buttery goodness in no time. By the end, you’ll have a rich, gooey treat that’s perfect for any occasion.
1. Preheat and Prepare
Start by preheating your oven to 350°F (175°C). Line a 9×13-inch baking pan with parchment paper or lightly grease it with nonstick spray. Prepping the pan ensures that your brownies won’t stick, making it easier to cut and serve them later. A properly lined pan will also help lift the brownies out effortlessly once they’ve cooled.
2. Mix the Brownie Batter
In a large mixing bowl, whisk together the melted butter, granulated sugar, and brown sugar until smooth. This step is crucial for creating that signature fudgy texture. The sugars dissolve slightly into the butter, helping to form a rich, chewy bite. Add the vanilla extract and eggs, mixing well after each addition. The eggs help bind the ingredients together and add richness to the batter. Be sure to mix thoroughly so that your brownies have a consistent texture.
In a separate bowl, whisk together the flour, cocoa powder, salt, and baking powder. Slowly fold the dry ingredients into the wet ingredients, stirring just until combined. Don’t overmix—nobody likes tough brownies! Overmixing can develop too much gluten, leading to a dense or rubbery texture. Instead, use a spatula and gently fold until you no longer see streaks of flour.

3. Make the Peanut Butter Swirl
In a small bowl, mix the peanut butter, powdered sugar, and vanilla extract. If it feels too thick, add a tablespoon or two of milk to thin it out so it’s easier to swirl. The peanut butter swirl adds an extra layer of flavor and texture, making these brownies extra special. The swirl is what gives these brownies their signature look and flavor, so take your time to mix it to a smooth consistency.

4. Assemble and Swirl
Pour the brownie batter into the prepared baking pan, spreading it evenly. Drop spoonfuls of the peanut butter mixture over the top, then use a knife or toothpick to swirl it through the batter. This doesn’t need to be perfect—just make sure every bite gets some peanut butter goodness. The more swirls, the more visually appealing and flavorful your brownies will be. Be creative and have fun with the swirling—it’s what makes each batch unique!
5. Bake to Perfection
Bake for 30–35 minutes, or until a toothpick inserted in the center comes out with a few moist crumbs. The brownies will continue to set as they cool, so don’t overbake them. If they look slightly underdone in the middle, that’s okay—they will firm up as they rest. Remember that brownies will keep baking slightly even after they are removed from the oven due to residual heat.

6. Cool and Serve
Let the brownies cool in the pan for at least 20 minutes before slicing. If you can wait that long, you have way more willpower than I do! Cutting them too soon may cause them to crumble, so patience is key. Once cooled, slice them into squares and dig in. For even cleaner cuts, you can chill the brownies in the refrigerator for about 30 minutes before slicing.

If you love starting your day with something sweet and satisfying, these peanut brownies are a perfect breakfast treat! They pair amazingly with a hot cup of coffee or a cold glass of milk. And if you’re looking for more delicious ways to kick off your morning, check out my best breakfast recipes for even more tasty ideas!
Tips for the Best Peanut Butter Brownies
- Use high-quality cocoa powder for the best chocolate flavor. The better the cocoa, the richer your brownies will taste. Opt for Dutch-process cocoa for a smoother, deeper chocolate flavor, or go with natural cocoa for a more classic brownie taste. Experiment with different brands to find your favorite.
- Melt the peanut butter slightly so it’s easier to swirl. Cold peanut butter won’t spread as easily and may clump. You can warm it in the microwave for about 15-20 seconds or on the stovetop over low heat to get that perfect consistency. Using a creamy peanut butter ensures a smoother swirl, while crunchy peanut butter adds a delightful texture.
- Don’t overbake—brownies should be fudgy, not dry! Keep an eye on the baking time to achieve that perfect gooey center. If you prefer extra gooey brownies, remove them from the oven when a toothpick still has a few moist crumbs clinging to it. Remember that brownies continue to cook slightly as they cool.
- For extra peanut butter goodness, add peanut butter chips to the batter. This will give an extra burst of peanut flavor in every bite. You can also try mixing in chopped peanuts for added crunch, or drizzling extra melted peanut butter over the top after baking for an even richer experience.
- Did you know that peanuts aren’t just delicious but also packed with nutrients? They’re a great source of protein, healthy fats, and essential vitamins. Plus, they can help with heart health and energy levels! If you’re curious about the full health benefits of peanuts, check out this detailed guide.
Tips for the Best Peanut Butter Brownies
- Use high-quality cocoa powder for the best chocolate flavor. The better the cocoa, the richer your brownies will taste.
- Melt the peanut butter slightly so it’s easier to swirl. Cold peanut butter won’t spread as easily and may clump.
- Don’t overbake—brownies should be fudgy, not dry! Keep an eye on the baking time to achieve that perfect gooey center.
- For extra peanut butter goodness, add peanut butter chips to the batter. This will give an extra burst of peanut flavor in every bite.
Storage and Freezing
These brownies stay fresh for up to 5 days at room temperature if stored in an airtight container. Want to keep them longer? Freeze them! Just wrap them tightly and store them in the freezer for up to 3 months. When ready to enjoy, let them thaw at room temperature or warm them up in the microwave for a fresh-from-the-oven taste.
FAQs
1. Can I use natural peanut butter?
Yes, but the texture might be a little different. Natural peanut butter tends to be more liquidy or separated due to the absence of stabilizers. If using natural peanut butter, stir it well before using to prevent separation. Additionally, it may result in a slightly grainier texture compared to regular peanut butter. If you want a smoother consistency, you can add a teaspoon of vegetable oil or melted butter to stabilize it before mixing it into the batter.
2. What if I like cakey brownies?
If you prefer cakey brownies over fudgy ones, there are a couple of easy adjustments you can make. Increase the flour to 1 1/4 cups and bake a little longer for a more cake-like texture. Adding an extra egg can also help create a lighter texture by incorporating more air into the batter. Additionally, you can reduce the butter slightly and add an extra tablespoon of milk to make the batter lighter. If you want to enhance the cake-like texture even more, try whisking the eggs and sugar together until the mixture becomes pale and fluffy before adding the other ingredients.
3. Can I make these gluten-free?
Yes! Just substitute the all-purpose flour with a 1:1 gluten-free flour blend. This way, everyone can enjoy these delicious brownies. When choosing a gluten-free flour, look for a blend that contains xanthan gum, which helps maintain the structure of the brownies. Some gluten-free flours absorb more liquid than regular flour, so if your batter seems too thick, you can add a tablespoon of milk to adjust the consistency. If you want to add more structure to your gluten-free brownies, try adding a teaspoon of cornstarch to the flour blend for extra stability.
4. How do I get clean brownie slices?
Use a sharp knife and wipe it clean between cuts. This helps prevent the brownies from sticking to the knife and making messy slices. For even cleaner cuts, chill the brownies for 15 minutes before slicing. Another trick is to use a warm knife—simply dip your knife in hot water, dry it off, and then slice. This method helps create ultra-smooth, even brownie squares. If you’re serving brownies at an event or gathering, consider using a ruler to measure and mark even slices before cutting.
5. Can I add chocolate chips?
Absolutely! Fold in 1/2 cup of chocolate chips for extra chocolatey brownies. This will add extra melty goodness to every bite. You can also experiment with different types of chocolate chips—semi-sweet, dark, milk, or even white chocolate chips for a unique twist. If you’re feeling adventurous, try adding peanut butter chips or chopped Reese’s cups for an even richer peanut butter-chocolate combination. For a crunchier texture, you can also sprinkle chopped nuts like walnuts or pecans into the batter along with the chocolate chips.
Conclusion
These peanut butter brownies are the perfect mix of rich chocolate and creamy peanut butter. They’re easy to make, loaded with flavor, and always a hit. Whether you’re making them for a party or just because you need a little chocolate fix, they won’t disappoint. So grab your ingredients and start baking—you deserve a treat! Don’t forget to share with friends and family, or keep them all to yourself (we won’t judge)